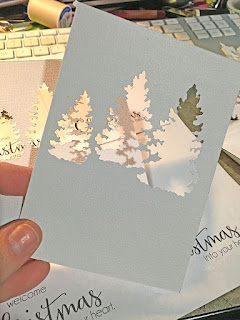
I adore handmade cards and I love making them each year and mailing them out to friends and family! This is the card I created for this year and I have to say it's one of my favorites. But the idea was not mine, I actually was inspired from a very talented paper crafter, Laurie with Stamping Up North. She created the card below last year with a stamped sentiment.
I do not typically do stamped anything and knew I could create the same look with my favorite crafting too, my PRINTER! I love using my Canon PIXMA iP8720 Crafting Printer for this technique because of the way the paper feeds into the printer (I'll explain below).
First, I had to cut the trees out of white cardstock using my Silhouette electronic cutter. You can cut your trees out using other electronic cutters, metal dies or punches.
But how do you get the sentiment on the paper??
This is how...
1. Design your sentiment on a full 8.5x11" sheet of paper and print out on regular paper.
2. You'll want to line up where you sentiment is going to print on your pre-cut pieces of cardstock. I use a window (or light box) and pre-cut cardstock piece behind to get an idea of it's placement. Once I figure that out I simply adhere the pre-cut cardstock piece to the front of the paper using temporary adhesive. I used a Xyron Tape Runner for this. If you don't have access to this adhesive, you can simply adhere the paper down using Washi Tape (it's a great temporary adhesive).
3. You do not want to get the any part of your pre-cut piece caught in your printer so I would highly recommend that you adhere down any part your concerned about. There is a small part where the two trees meet that I was concerned about. I simply placed a small amount of washi tape over that portion.
4. Place the sheet of paper with your pre-cut cardstock pieces adhered to it in top feeder of the Canon PIXMA iP8720 Crafting Printer and hit PRINT.
5. The sheet will look like this when it comes out of your printer. Carefully remove each pre-cut cardstock piece off of the original paper. You can continue to reuse the original sheet of printed paper. Then I simply finished assembling my card. And the BEST part about my printer....
I could also print my fancy envelopes and my 4x6" photo collage included in the card. And I could do this all at home!


1 comment:
Great idea! Thank you!
Post a Comment